
New feature – custom CSS
Elevate your Instagram widget design with our newest feature - Custom CSS! Create a unique look and feel for your website that perfectly aligns with your brand. Learn how to take advantage of this new feature today.
What is this new feature?
For those who don’t know – CSS allows web developers to define styles such as layout, colors, fonts, and other visual aspects of a website. In our case, that would be the visual presentation of Instagram widgets.
Each widget has CSS styles created automatically via our widget creator. For instance, if you change the button’s color, the proper CSS code is outputted directly into the widget.
With various options on our generator, you can achieve the desired appearance for your widget. However, certain things might not be available in our widget creator. Here comes our new addition – custom CSS. Add your CSS code to our widgets to adjust the Instagram plugin look even more to your needs!
Look on our Instagram widget examples page and scroll to the Custom CSS widget. You can see what you can achieve with this new option!
How to use custom CSS in my Instagram widget?
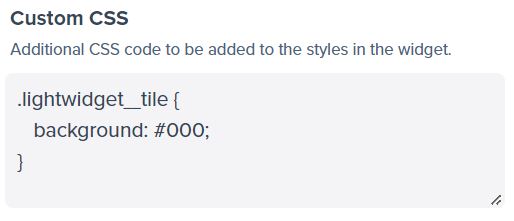
To add custom CSS to your feed:
- Create a new Instagram feed or edit the settings of your existing upgraded widget.
- Expand the Advanced section of the creator.
- Provide your CSS code in the Custom CSS text area.
When you update this field, the preview will refresh and display the changes in real time.
The technical side of Custom CSS
We know that changing widget styles with custom CSS requires knowledge of CSS itself. We recommend that only these users who know the CSS should be using this option.
Here are a couple of tips that might be helpful:
- Your custom styles will output to the individual
<style>tag. This tag will appear in the<head>section just after the code generated by our widget creator. - We do CSS minification on our side, but you can use minified code too.
- You can use the
@importrule to include additional fonts or styles. - You can also have CSS code hosted on your website instead of copy-paste them into a text field. Use the
@importrule. You can find an example below. - We use BEM in our styles in case you wonder about class names.
- The class names are added dynamically to the widget based on its configuration. Configure the widget through our creator to see the available classes and then add your code.
- Please note that we add new features or improve our current styles. It can cause conflicts with your custom CSS. If you notice something is not working and use custom CSS, please verify if any style changes might affect your code.
- Adding tons of custom CSS or
@importscan slow down the loading time of your widget. Please use this feature wisely:)
How to load the styles from my server?
You can load custom CSS from your server to improve your workflow, use PostCSS and Sass, or keep the styles inside your code repository.
Create the .css file that will be publicly available and use its URL in the advanced CSS like so:
@import url(https://mywebsite.com/path/to/styles/for/lightwidget.css);
Remember that the URL must be publicly available to be correctly loaded.
Additional info
If you manage to add some cool features with custom CSS and you think that it should be part of our widget generator, use our Support page and submit the ticket with your code:)
Let us know if you need help adjusting the widget’s look! We will provide a useful code snippet for your needs.
Hi - If I want to change the css on my widget to display more than one or two lines of text with the instagram code, what would the correct format?
203 Squash •
Hi there. Do you refer to hover effect "Show caption" or to regular captions in grid/slideshow module?
LightWidget •
on hover
VE AND VILE •
So if it is for hover effect, you need to apply custom CSS like so: .lightwidget.lightwidget--hover-caption-slide-up .lightwidget__caption { white-space: normal; height: 60px; } You need to play around with height to show as many lines as you wish:)
LightWidget •
Hi. Is it possible to pass TAGS oin the html code somehow ?
davenam-E82 •
Hi there! It is not possible at the moment. If you require some additional tags, please open a support ticket and describe us the use case. We might be able to help you:)
LightWidget •
hi. I can not set :before content: ''. It always return before content: \'\' . Please help me
Không Hiểu Nổi •
Hi there! This is common issue with custom CSS at the moment. Backslashes are added to avoid potential security issues. In such case we recommend to host the file with additional styles to the widget on your website. File must be publicly available. In Custom CSS field simply import the file like so @import url(https://my.website.com/lightwidget-styles.css); It will solve the problem:)
LightWidget •
Thank you so much
Không Hiểu Nổi •
where I can find name of all classes to change?
MAB85™ •
Hi there! The classes names actually depends on the settings of the widget. The easiest way is to configure the widget as you like and then use for instance Element Inspector in Chrome to find out the classes name. You can override every class that you can find, we don’t have any restrictions here.
LightWidget •
HI, I try to change the z-index of the lighbox gallery but it doesn't work. Could you help me ?
me***@julienlambert.fr •
Hi there! You must change it in the CSS code on your website. The lightbox gallery is not a part of the iframe. We add it directly to your page. The Custom CSS field covers only the iframe contents.
LightWidget •